Set up a facility in your first week
Complete these tasks during the first week after a new facility goes live so that referrals, billing, and scheduling work correctly from day one.
Before you start
- You need the
adminorsuperadminrole. - Have the facility's main fax number, business hours, NPI, and Tax ID ready.
Steps
1. Confirm the facility UUID
- Open the Organization Selector in the top-left header and select the facility.
- Look at the browser address bar — the URL reads
/facility/{uuid}/dashboard. Copy theuuidsegment. - Share this UUID with any integration partners or API consumers; it is the stable identifier for this facility across all Medipyxis APIs.
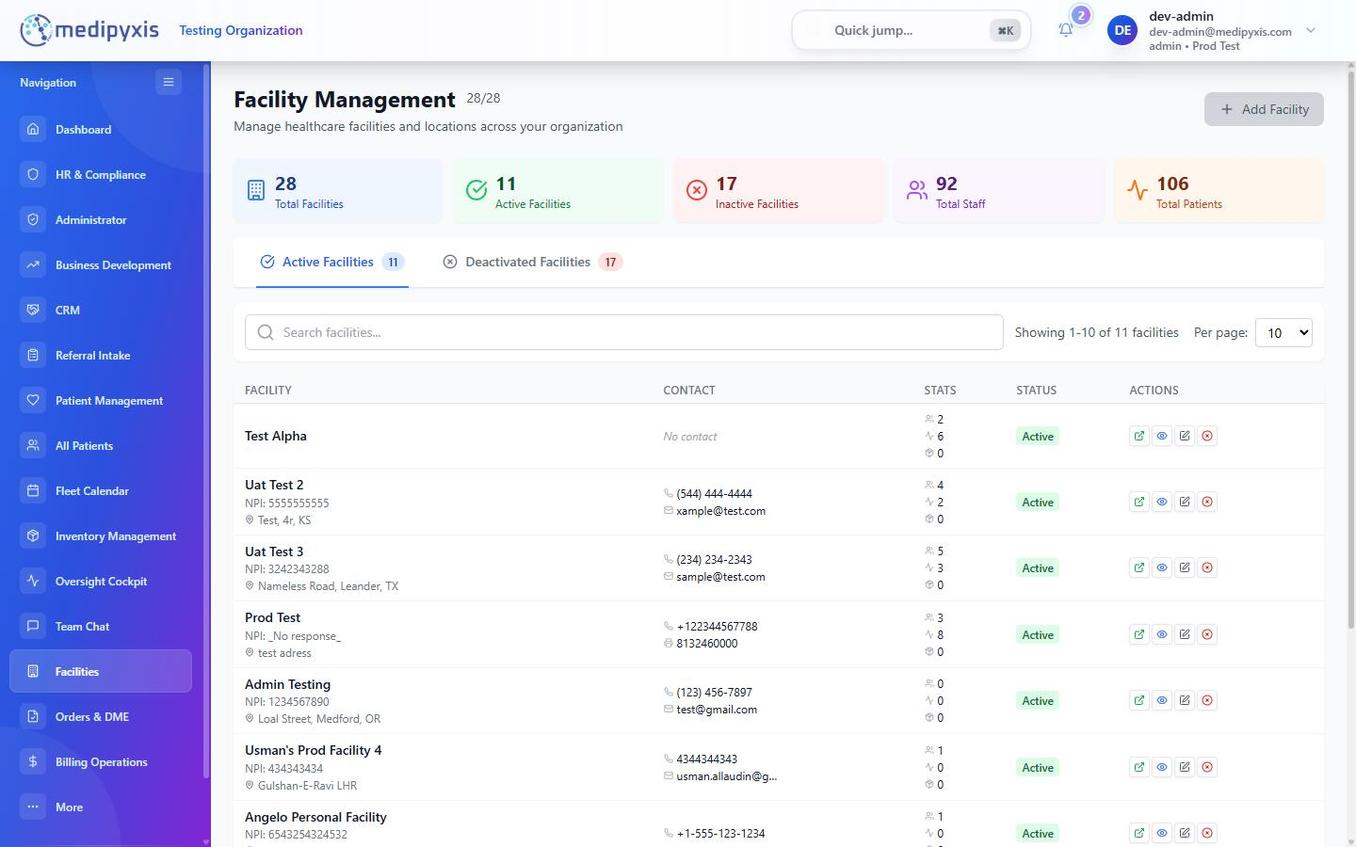 The Facilities list at
 /facilities. Confirm your facility shows Active in the STATUS column before proceeding.
2. Set the fax number
- Navigate to Facilities in the sidebar.
- Click Actions → Edit next to your facility.
- Enter the 10-digit fax number in the Fax Number field (no dashes or spaces required).
- Click Save.
3. Enter the facility NPI, Tax ID, and legal name
- In the facility edit panel, enter the facility NPI and Tax ID. Both are format-validated as you type.
- When you enter a valid 10-digit NPI, Medipyxis performs an NPPES lookup and offers to auto-fill the facility's legal name, address, and taxonomy from the CMS registry. Accept or decline the suggested values.
- If NPPES cannot confirm the NPI, a Save anyway? prompt appears — you can still save, but double-check the number.
- Click Save. The facility legal name is what appears on payer-facing claim output.
4. Set business hours
- In the facility edit panel, expand Business Hours.
- Toggle each day on or off and set Open and Close times in 30-minute increments.
- Business hours affect the SLA breach timer displayed on the Fax Review Queue and the Referral Intake kanban.
- Click Save.
5. Set intake SLAs
- Navigate to Referral Intake settings (accessible from the Referral Intake module → Settings gear icon, or see the Referral Intake Setup guide).
- Set the New Referral SLA (hours from fax receipt to first touch) and the Financial Clearance SLA (hours from financial column entry to clearance decision).
- These thresholds drive the red SLA Breach Timer shown on each referral card.
6. Set billing defaults
- Navigate to Billing → Charge Master.
- Confirm the facility's charge rates and, under the Templates tab, the default superbill template for this facility.
- Confirm the correct Default Rendering Provider NPI for this facility so it populates CMS-1500 §24J automatically on every new claim.
- See Billing Setup for full Charge Master and clearinghouse configuration.
Result
Your facility is Active, has a fax number, a validated NPI/Tax ID and legal name, enforces business-hour SLAs on Referral Intake, and auto-populates a default rendering provider on new claims. Users can now be invited (see User Management).
Troubleshooting
| Symptom | Likely cause | What to do |
|---|---|---|
| Facility shows Inactive in the list | Not yet activated by Medipyxis support | Contact your implementation contact |
| NPPES cannot confirm the NPI | Number mistyped, or NPPES registry lag | Re-check the 10-digit NPI; you can still Save anyway if it is correct |
| SLA timer never turns red | Business hours not saved, or SLA set to 0 | Re-check business hours and SLA fields |
| Default rendering provider blank on new claims | Field not set in Charge Master / facility config | Complete Step 6 |