Complete the Wound Assessment (section 7)
Document all active wounds in section 7 of the Visit Wizard, capturing anatomy, measurements, tissue percentages by wound, precise anatomical location, exudate, pain, and photos needed for Medicare LCD compliance and longitudinal wound tracking.
Before you start
- You have completed steps 1–6 of the Visit Wizard for this encounter.
- You have a ruler or wound measurement tool available for length, width, and depth.
- A camera-enabled device is ready if photo upload is required by your facility protocol.
Steps
Open Wound Assessment
- Reach step 7. Complete steps 1–6 in sequence. The step navigator highlights Wound Assessment when you arrive.
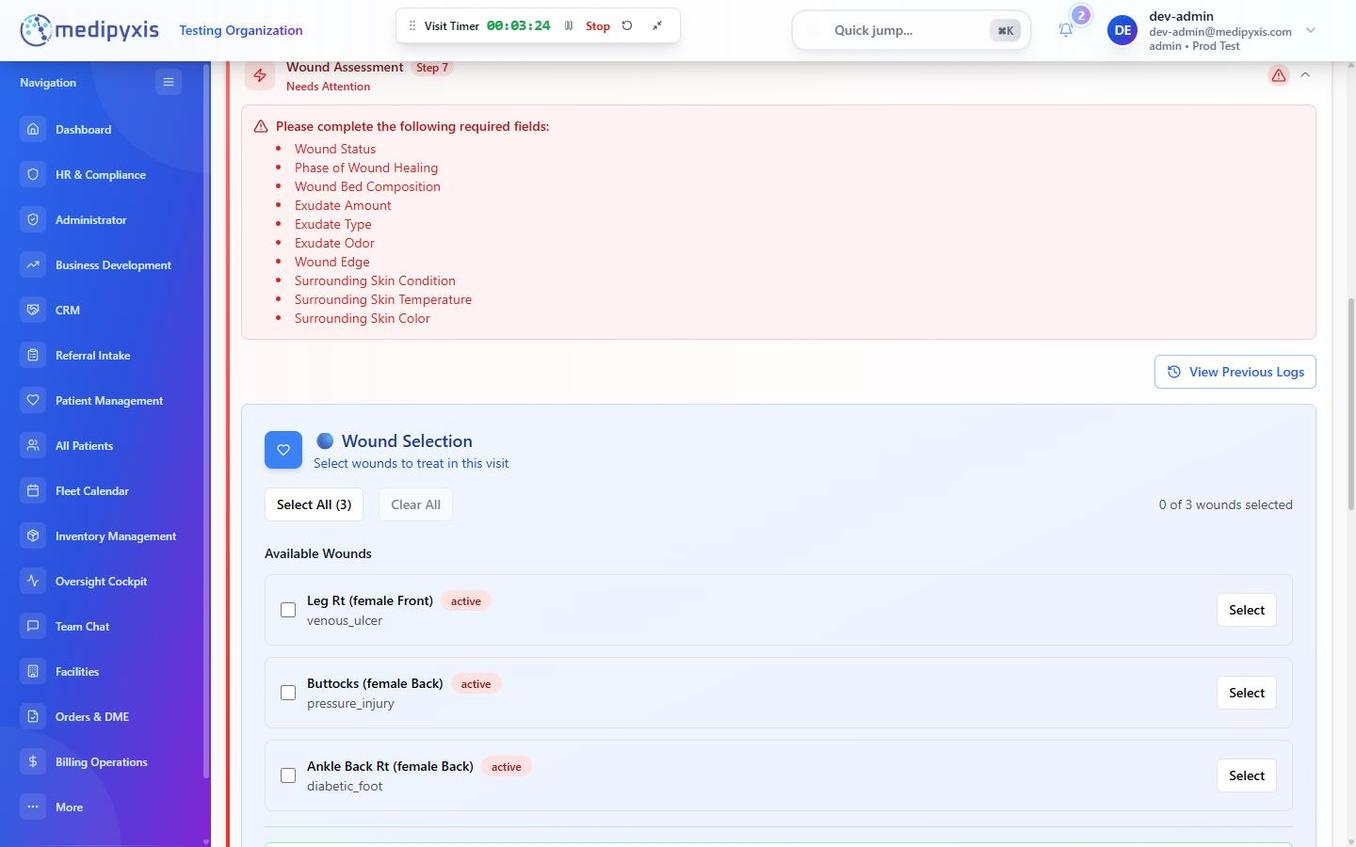
Step 7 opens with a list of wounds carried forward from the patient's chart. Click a wound to assess it or click Add Wound to document a new one.
- Select the wound or add a new one. Click an existing wound to open its assessment form, or click Add Wound if this is a new wound.
Complete the wound assessment form
- Fill in identification and location fields.
| Field | Details |
|---|---|
| Wound # | Auto-assigned; read-only for existing wounds |
| Anatomic Location | Editable, precise anatomic site (for example, Right lateral malleolus). The location field is editable per-wound. |
| Laterality | L (Left) · R (Right) · B (Bilateral) |
| Onset Date | Calendar picker |
| Duration (weeks) | Auto-calculated from Onset Date; editable |
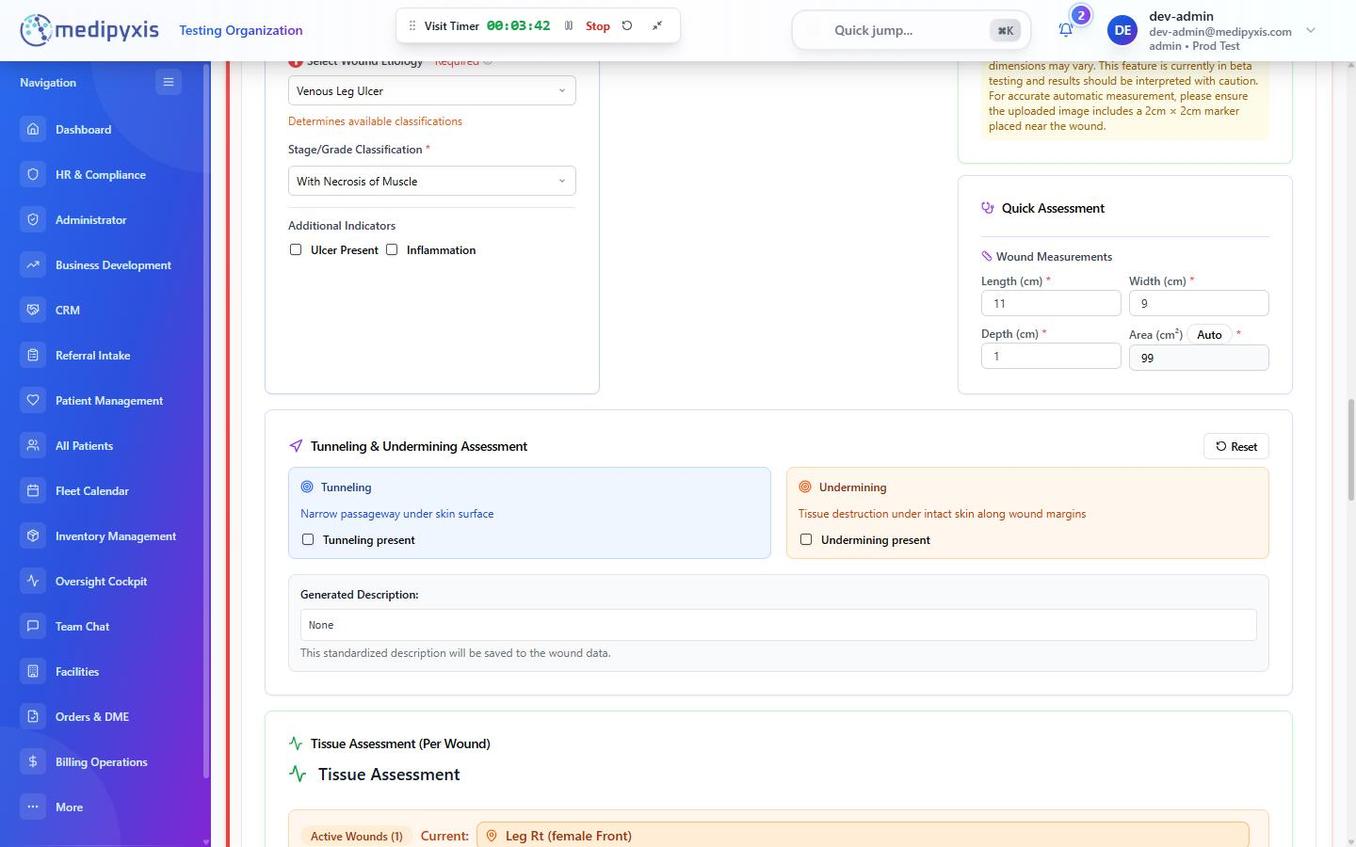
The top section of the wound assessment form. Required fields are marked with an asterisk.
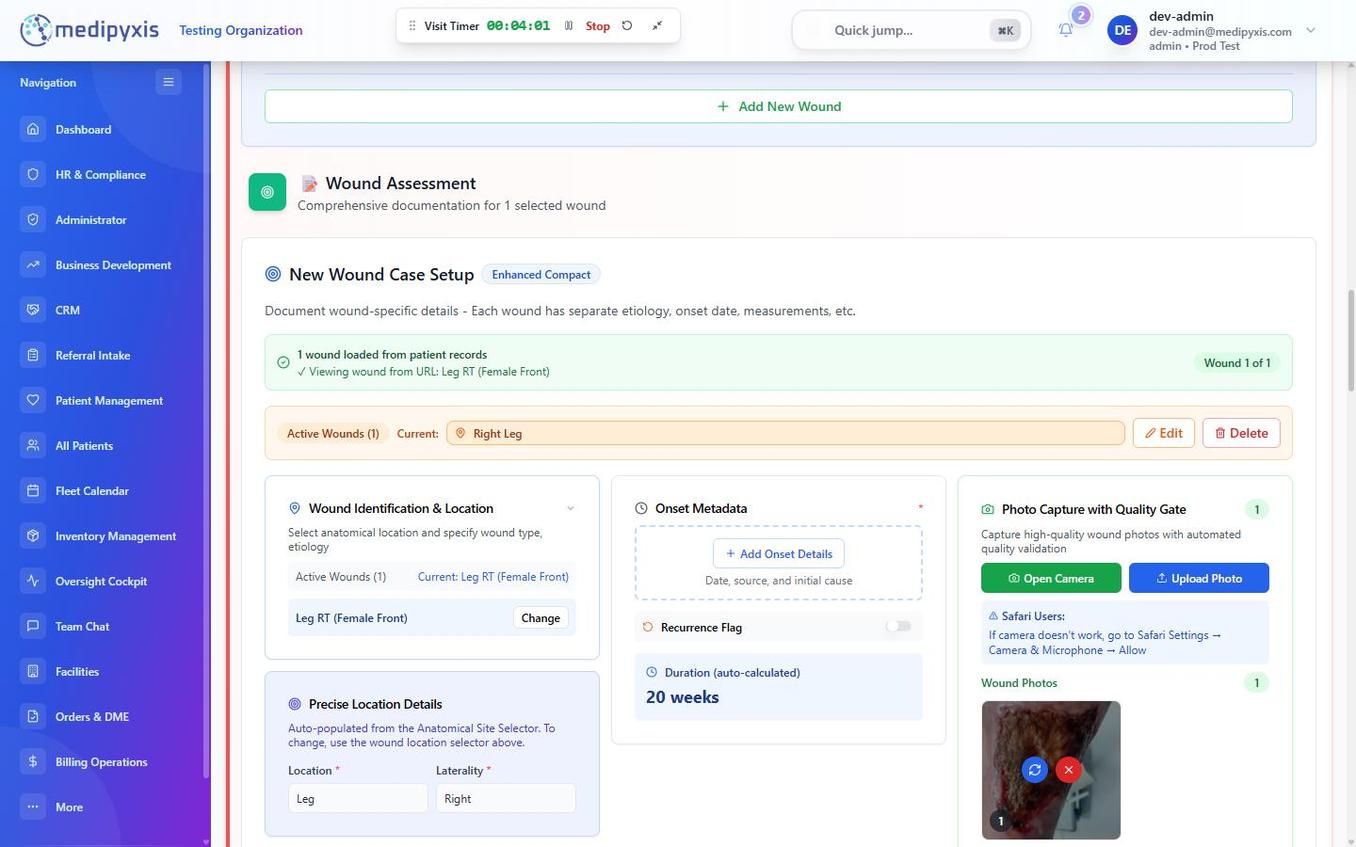
The wound assessment form in its initial state, before fields are populated.
- Select Etiology. Choose one value:
| Value | Description |
|---|---|
DFU |
Diabetic Foot Ulcer |
VLU |
Venous Leg Ulcer |
PU |
Pressure Ulcer |
Arterial |
Arterial insufficiency ulcer |
Mixed |
Mixed arterial-venous etiology |
Surgical |
Post-surgical wound |
Traumatic |
Traumatic wound |
Other |
Other — requires free-text clarification |
- Select Stage / Classification. Choose the classification system appropriate to the wound type:
| Value | Notes |
|---|---|
Wagner scale |
For diabetic foot ulcers (Wagner 0–5) |
Stage I |
Non-blanchable erythema of intact skin |
Stage II |
Partial thickness skin loss |
Stage III |
Full thickness skin loss |
Stage IV |
Full thickness tissue loss |
Unstageable |
Obscured base — cannot determine depth |
DTI |
Deep Tissue Injury — suspected |
- Enter measurements.
| Field | Unit | Notes |
|---|---|---|
| Length (cm) | centimeters | Greatest dimension |
| Width (cm) | centimeters | Perpendicular to length |
| Depth (cm) | centimeters | Deepest point |
| Area cm² | square centimeters | Auto-calculated as Length × Width |
Record Tunneling depth (cm) and direction, and Undermining using o'clock position and centimeters from the wound edge if present.
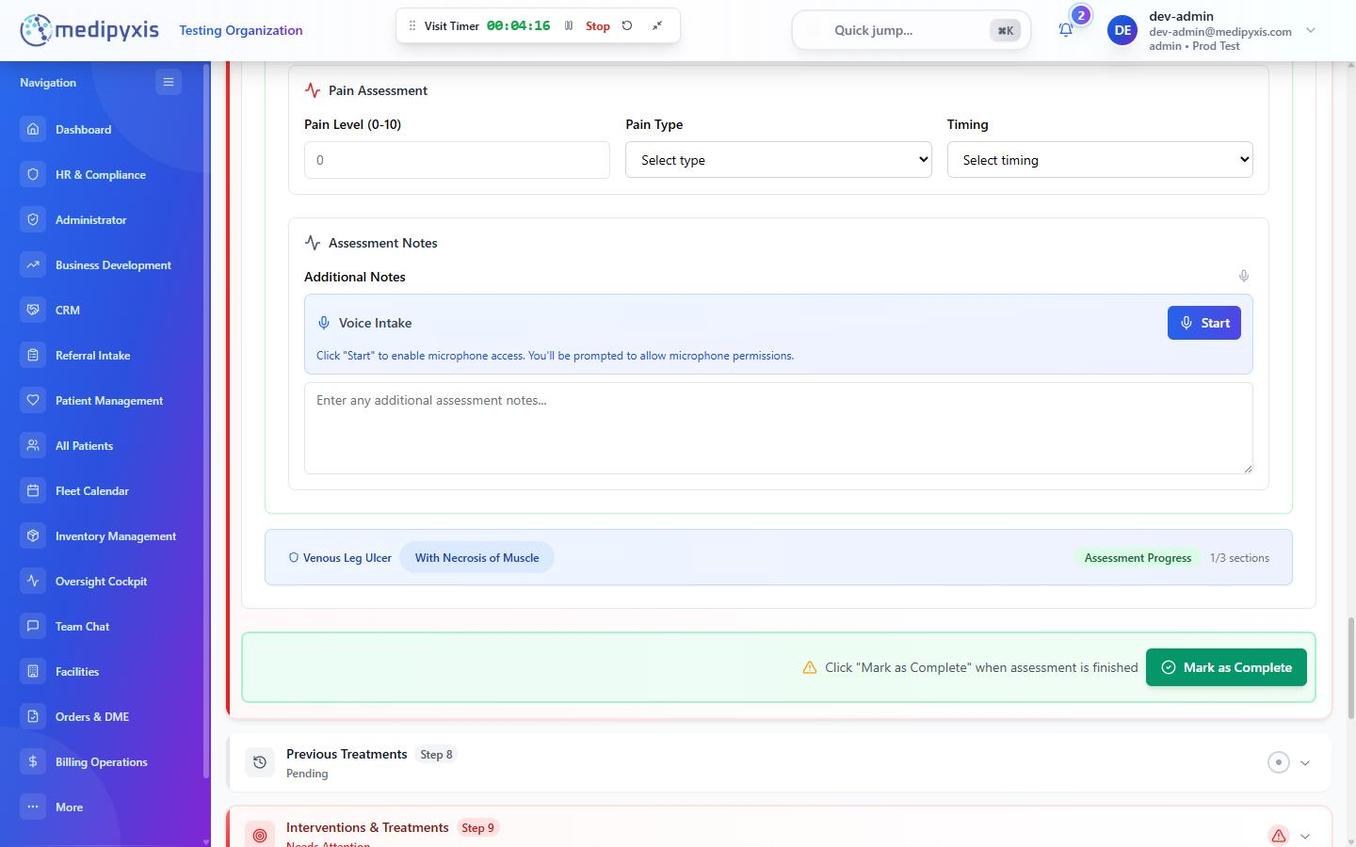
The mid-section of the form showing tunneling, undermining, periwound condition, wound edges, and pain scale.
- Document tissue composition. The five fields must sum to exactly 100%.
| Tissue Type | Field | Acceptable range |
|---|---|---|
| Granulation | Granulation % | 0–100 |
| Slough | Slough % | 0–100 |
| Necrotic | Necrotic % | 0–100 |
| Epithelial | Epithelial % | 0–100 |
| Eschar | Eschar % | 0–100 |
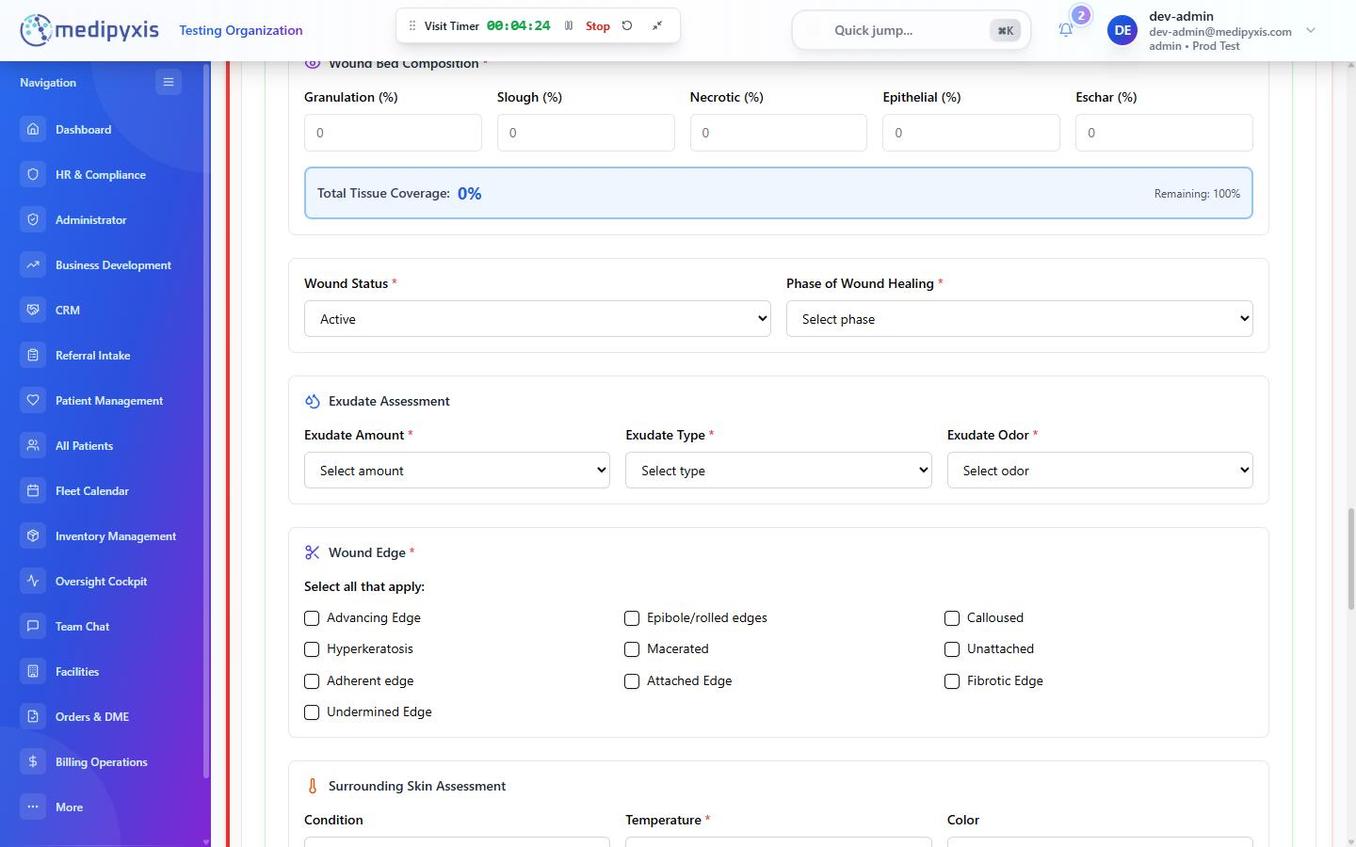
Tissue composition entry. The running total indicator turns red if the sum exceeds or falls below 100%.
- Select Exudate Amount and Type.
| Field | Options |
|---|---|
| Exudate Amount | None · Scant · Small · Moderate · Large · Copious |
| Exudate Type | Serous · Serosanguineous · Sanguineous · Purulent |
-
Record Odor. Toggle Odor to
YorN. -
Select Periwound condition.
Value Clinical meaning IntactNo periwound changes MaceratedSoftening from prolonged moisture ErythematousRedness around wound margins CallusHyperkeratotic periwound tissue HyperpigmentedPost-inflammatory darkening -
Select Wound Edges.
Value AttachedEpiboleRolled -
Rate Pain. Drag the slider or type a number for Pain 0–10 (0 = no pain, 10 = worst imaginable pain).
-
Complete the Infection Signs checklist. Check all that apply from the infection indicators list (erythema, warmth, swelling, purulent drainage, malodor, increased pain, fever, lymphangitis, cellulitis). Leave unchecked if absent.
-
Upload a photo. Click Photo Upload, then select a photo from the device camera or library. At least one photo per wound per visit is recommended by most facility protocols.
Many Medicare LCDs require photographic documentation at each visit for advanced biological therapy (graft) coverage. Confirm your facility's protocol and upload the photo before leaving the patient's location. -
Click Save Wound. The wound record saves and you return to the wound list. Repeat steps 2–14 for each additional wound.
-
Click Next to advance to step 8, Previous Treatments, once all wounds are documented.
Validation
If any required field is missing or tissue percentages do not sum to 100, the wizard displays inline validation errors.
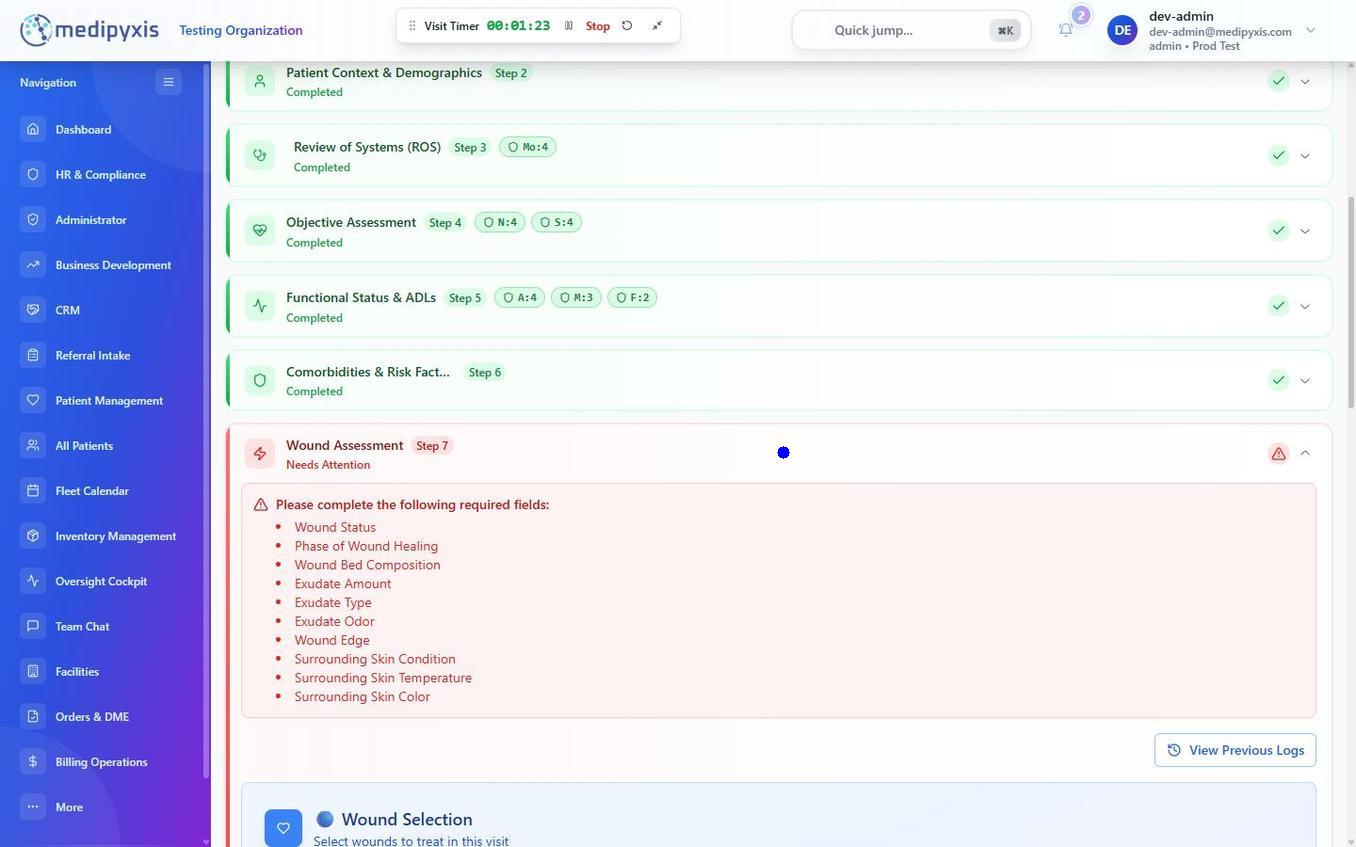
Validation state: red outlines indicate fields that must be resolved before advancing.
Result
Each wound has a saved assessment record with measurements, tissue composition, exudate, pain score, infection status, and at least one photo. On save, the LCD audit fires automatically and refreshes the LCD ambient badge — items like Dimensions measured today, Tissue percentages sum to 100, and Precise anatomical location flip from amber to green as soon as the data is on file.
Troubleshooting
| Symptom | Likely cause | What to do |
|---|---|---|
| Next button disabled | Tissue composition does not sum to 100% | Check the running total indicator and adjust percentages |
| Next button disabled | Required field missing | Scroll up — missing fields are outlined in red |
| Photo upload fails | File size exceeds 10 MB or unsupported format | Reduce image size or use JPEG/PNG format |
| Area cm² not updating | Length or Width field is empty | Enter both Length (cm) and Width (cm) values |
Related
Auto-rendered from related: in frontmatter.